Before You Go — Get BrandBoa Updates Top Products, Shed Plans & Estimating Tips
Join homeowners, DIY builders & contractors
Subscribe to receive construction product recommendations, shed plan updates, BOQ tips, and useful buying guides for tools, materials, finishes, and building essentials. We’ll help you discover selected products from trusted USA suppliers and share practical ideas to plan, price, and build smarter.
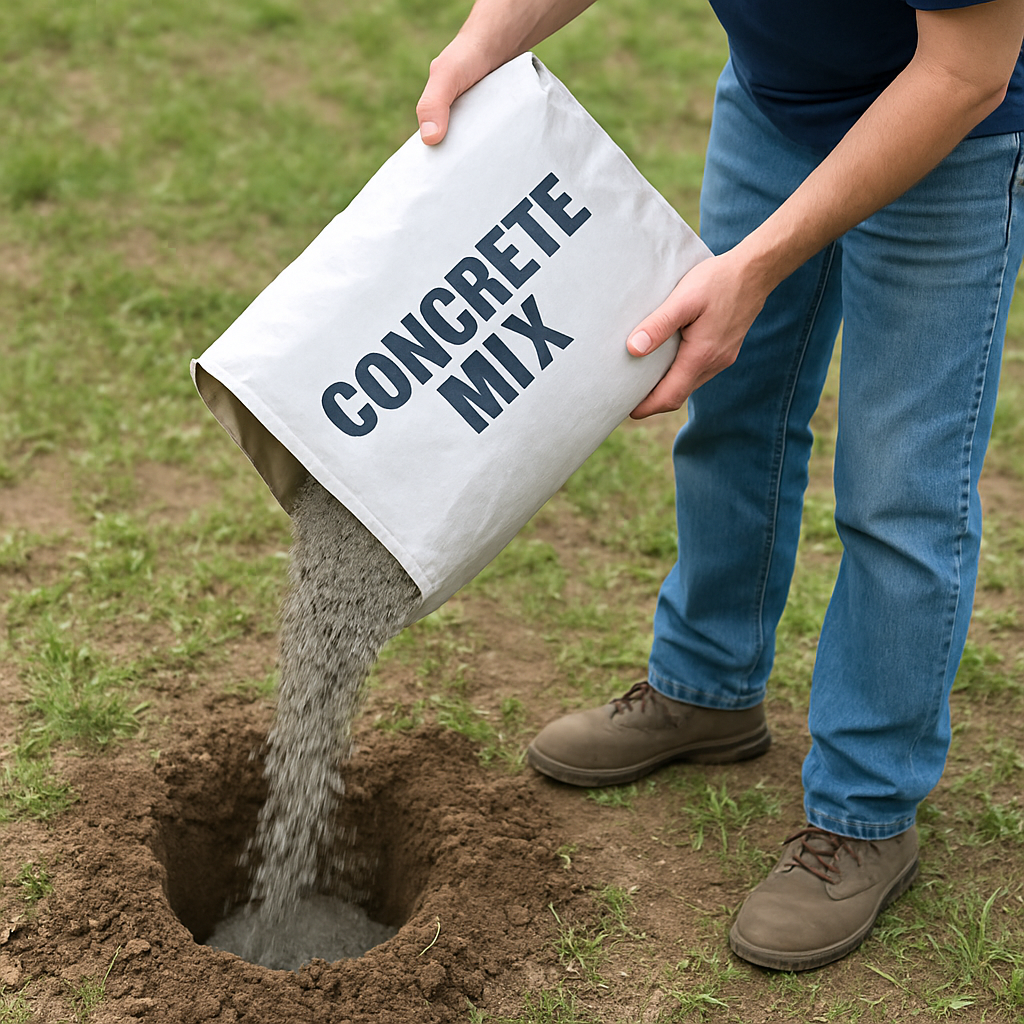
Building a sturdy, reliable fence starts from the ground up. You can buy the most premium cedar panels or the highest-grade vinyl, but if your posts start wobbling after a harsh winter or a heavy summer storm, all that hard work and money will go down the drain. The most common question that DIYers and new fence builders ask when planning their project is exactly how much concrete per fence post they actually need.
It might seem like a simple guessing game, but getting this specific calculation right is what ensures your fence stands tall through heavy winds, changing seasons, and shifting soil. Underestimating leaves your fence vulnerable to leaning, while overestimating wastes money and backbreaking labor. Let’s dive deep into the math, the best methods, and the exact materials you need to build a rock-solid perimeter for your property.
The Golden Rules: Sizing Your Post Holes
Before you can accurately determine how much concrete per post for fence installations you need, you first have to dig the correctly sized hole. The physical dimensions of your hole dictate everything about your material list.
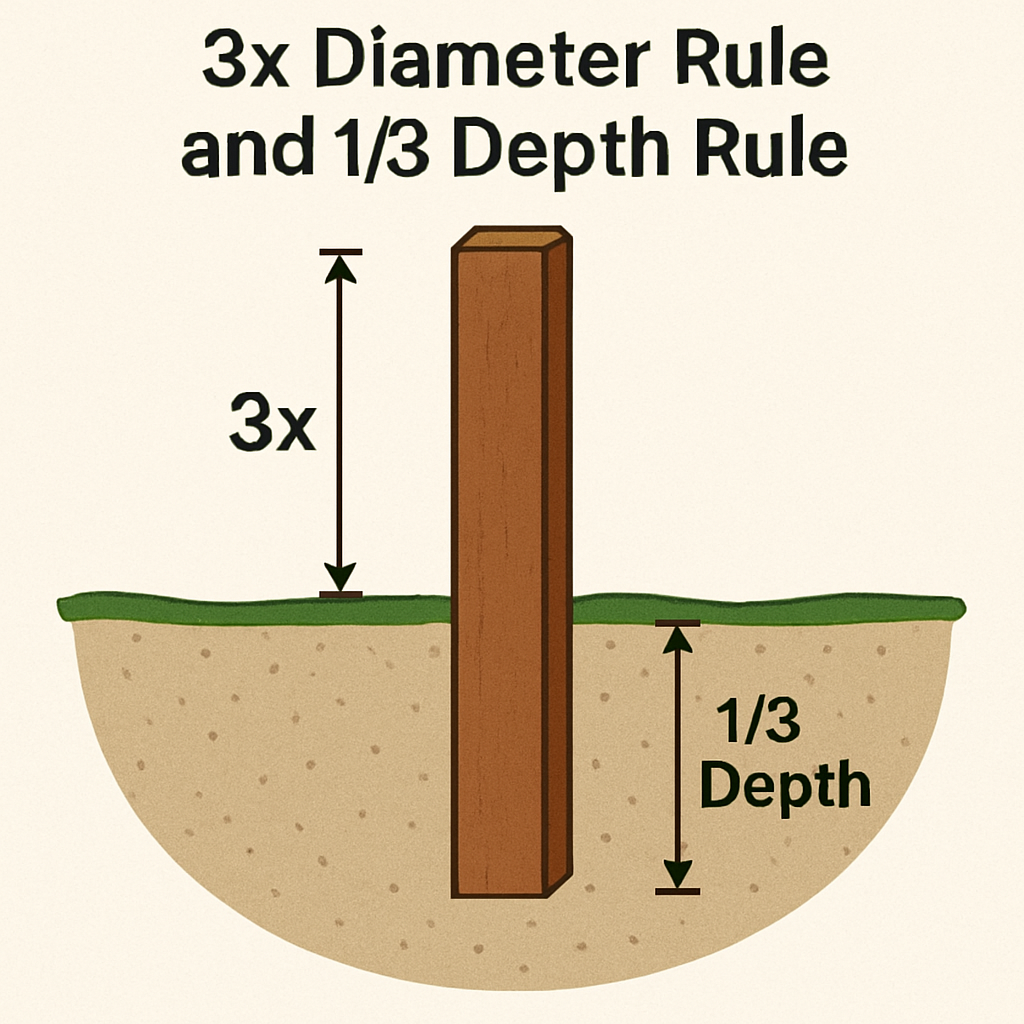
The 1/3 Depth Rule
Generally, your hole needs to be deep enough to bury 1/3 to 1/2 of the above-ground height of the post. For a standard 6-foot privacy fence, this means you need at least 2 feet of post underground. Because of this, the average depth for residential fence posts usually ranges from 24 to 36 inches.
However, your local climate plays a massive role in this metric. If you live in an area that experiences freezing winter temperatures, setting fence posts below frost line is an absolute, non-negotiable requirement. If you fail to dig below the frost line (which can be 36 to 48 inches deep in northern regions), moisture in the soil will freeze, expand, and push your posts right out of the ground—a destructive process known as frost heave. The structural stability of deep set posts relies entirely on meeting and exceeding these regional depth requirements.
The 3x Diameter Rule
A widely accepted industry standard is making your hole diameter roughly three times the width of the post itself. For example, when calculating concrete bags for 4×4 posts (which actually measure 3.5 by 3.5 inches), your ideal hole diameter should be between 10 and 12 inches wide.
If you are building a larger structural fence or a heavy farm gate, you’ll need bigger posts. The proper post hole diameter for 6×6 timber (which measures 5.5 by 5.5 inches) should be around 16 to 18 inches. Skimping on the diameter to save on digging time will drastically reduce the concrete collar around the wood, making it highly susceptible to wind damage.
Calculating Your Concrete Needs
To completely take the guesswork out of your backyard project, you can easily use a free fence post hole volume calculator online. However, it is incredibly helpful to understand the basic math behind the screen so you can adjust on the fly if your mechanical auger digs a slightly wider hole than intended.
The Math Behind the Pour
To find the volume of your cylindrical hole, you need the basic geometric formula for the volume of a cylinder: Pi x r² x h.
Find the radius: Divide the diameter of your hole by two.
Square that number: Multiply the radius by itself.
Multiply by Pi: Multiply that number by 3.14.
Multiply by the depth: Multiply by the depth of your hole in inches.
Convert to cubic feet: Divide the total by 1,728.
Once you know the cubic feet of your hole, you simply subtract the volume of the wooden post sitting inside it. What remains is the exact volume of empty space that needs to be filled with concrete.
Keep in mind that not all posts are created equal. End posts, corner posts, and gates carry significantly more weight and tension than standard line posts. Because of this, the concrete requirements for gate posts are fundamentally higher. You will generally want to dig a wider, deeper hole—requiring more concrete—to prevent these vital anchor points from sagging into the mud over time.
How Many Bags Do You Actually Need?
Now, let’s answer the big question: how many bags of concrete per fence post should you load into the back of your truck?
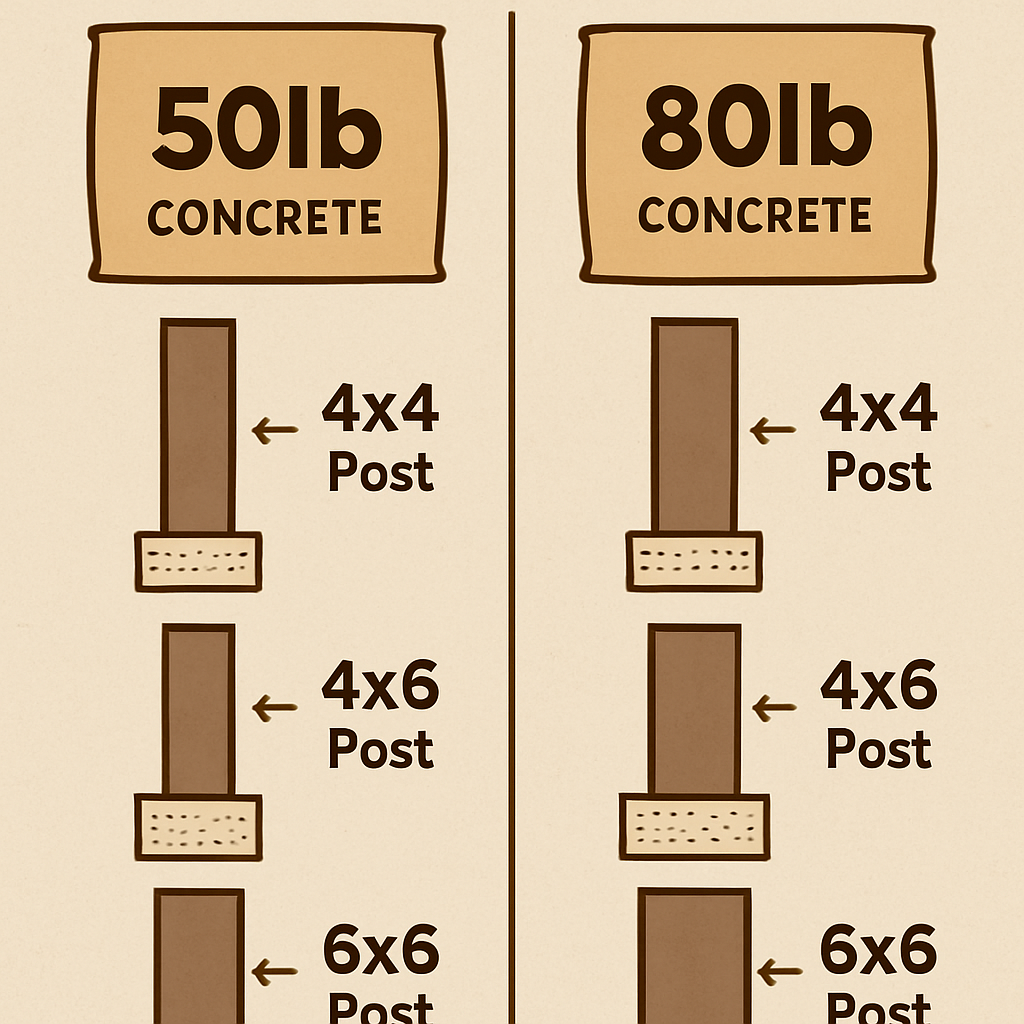
Concrete is sold by weight, but applied by volume. To bridge this gap, you need to look at the manufacturer’s yield. A common metric to evaluate is the quikrete yield for post holes (which is virtually identical across other major brands like Sakrete). Typically, an 80-pound bag yields about 0.60 cubic feet of mixed concrete, while a 50-pound bag yields about 0.37 cubic feet.
Bag Count by Weight
How many 50lb bags of concrete per fence post? For a standard 4×4 post set in a 10-inch diameter hole dug 24 inches deep, you will need approximately 2.5 to 3 bags of 50lb concrete. While these lighter bags are much easier on the back and highly recommended for solo DIYers, they do require you to open, pour, and mix more individual bags per hole.
How many 80lb bags for one post? Using the heavier 80lb bags is vastly more cost-effective and time-efficient for larger fencing projects. For that exact same 10-inch diameter, 24-inch deep hole housing a 4×4 post, you will only need 1.5 to 2 bags of 80lb concrete.
If you are stepping up to heavy-duty installations, the numbers jump significantly. If you move up to a robust 6×6 post in an 18-inch hole going 36 inches deep, you could easily need 5 to 7 of those 80lb bags per post. Always buy 10% more than your strict mathematical calculation to account for uneven digging, spilled mix, and slightly oversized holes.
Choosing the Right Concrete Type and Method
When you walk down the masonry aisle at your local hardware store shopping for fence post concrete, the mountain of options can be overwhelming. Not all concrete is created equal, and choosing the right fence post mix is vital for your project’s timeline, budget, and durability.
Fast Setting vs Regular Concrete
When weighing fast setting vs regular concrete for fencing, your available time and project budget are your main deciding factors.
Fast-Setting Concrete: Often labeled specifically as fast-setting post hole concrete, this special blend cures incredibly quickly—usually in 20 to 40 minutes. This means you can confidently hang your heavy wooden rails and pickets on the very same day.
Regular Concrete: Standard concrete is usually cheaper per bag but typically takes 24 to 48 hours to cure enough to bear a load, and up to 28 days to reach its absolute maximum strength.
Fast-setting mixes are incredibly popular among homeowners because they are specifically formulated to allow for the dry pour concrete method for posts. With a dry pour, you simply place your braced post in the hole, pour the dry concrete mix directly out of the bag and around the wood, and then pour a specified amount of water directly on top. The mix absorbs the water naturally. This completely eliminates the need for a wheelbarrow and heavy, messy mixing.
Best Mixing Practices
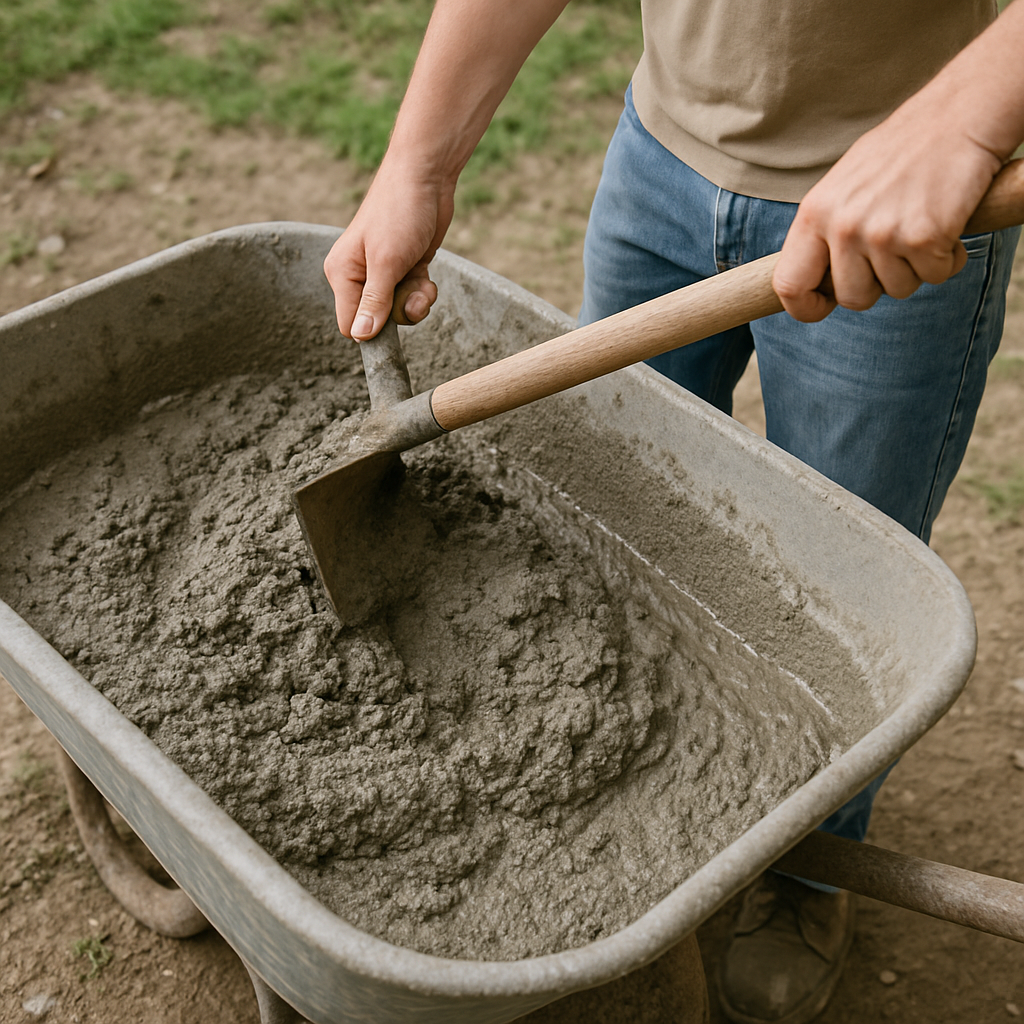
If you opt for traditional, standard mixes, you will have to choose between premixed concrete vs hand mixing for posts. While you can rent a power mixer or order a ready-mix truck for huge commercial jobs, most residential fences are done by hand. Hand-mixing bags in a heavy-duty wheelbarrow gives you excellent, tactile control over the material’s consistency.
When hand mixing, you must strictly follow the manufacturer’s recommended water to concrete mix ratio for fencing. Adding too much water makes the concrete easier to pour but severely weakens its final structural integrity, making it prone to cracking in the winter. Conversely, adding too little water creates a dry, crumbly mixture that fails to cure properly and won’t adhere firmly to the post.
Best Practices for Long-Lasting Posts
Even if you figure out exactly how much concrete per fence post you need and buy the best materials, poor installation techniques can still lead to premature fence failure.
The Foundation of Your Post
Before pouring a single drop of concrete, add about 4 to 6 inches of crushed gravel to the very bottom of your hole and tamp it down tight. The long-standing debate of concrete vs gravel for post base is easily settled by seasoned fencing professionals: use both! The gravel acts as an essential drainage system. When rain runs down the sides of the post, the gravel allows the water to safely drain away into the soil rather than pooling around the bottom of the wood.
Defending Against Moisture
Speaking of moisture, preventing wood rot in concrete footings should be your top priority during the final stages of the pour. Never let your wet concrete cure into a flat shape or a sunken “bowl” at ground level. This will trap rainwater right against the wood, drastically accelerating rot.
Instead, when the concrete is near the top of the hole, use a trowel to shape the surface so it forms a small dome or slope that pushes away from the post. This simple technique effortlessly sheds rainwater away from the vulnerable wood. Combine this domed top with your tamped gravel base, and you have built a post foundation designed to outlast the harshest elements.
Final Thoughts
Figuring out how much concrete per fence post you need doesn’t have to be a frustrating obstacle. By respecting the 1/3 depth rule, properly sizing your hole diameters, and understanding the yield of different bag sizes, you can accurately order materials without wasting money. Whether you opt for a rapid-setting dry pour or a traditional hand-mixed approach, paying attention to the details—like sloping the concrete top and adding a gravel base—will ensure your fence remains a beautiful, steadfast feature of your property for years to come. Grab your post hole digger, double-check your math, and get ready to build with confidence!
Newsletter Updates
Enter your email address below and subscribe to our newsletter