Before You Go — Get BrandBoa Updates Top Products, Shed Plans & Estimating Tips
Join homeowners, DIY builders & contractors
Subscribe to receive construction product recommendations, shed plan updates, BOQ tips, and useful buying guides for tools, materials, finishes, and building essentials. We’ll help you discover selected products from trusted USA suppliers and share practical ideas to plan, price, and build smarter.
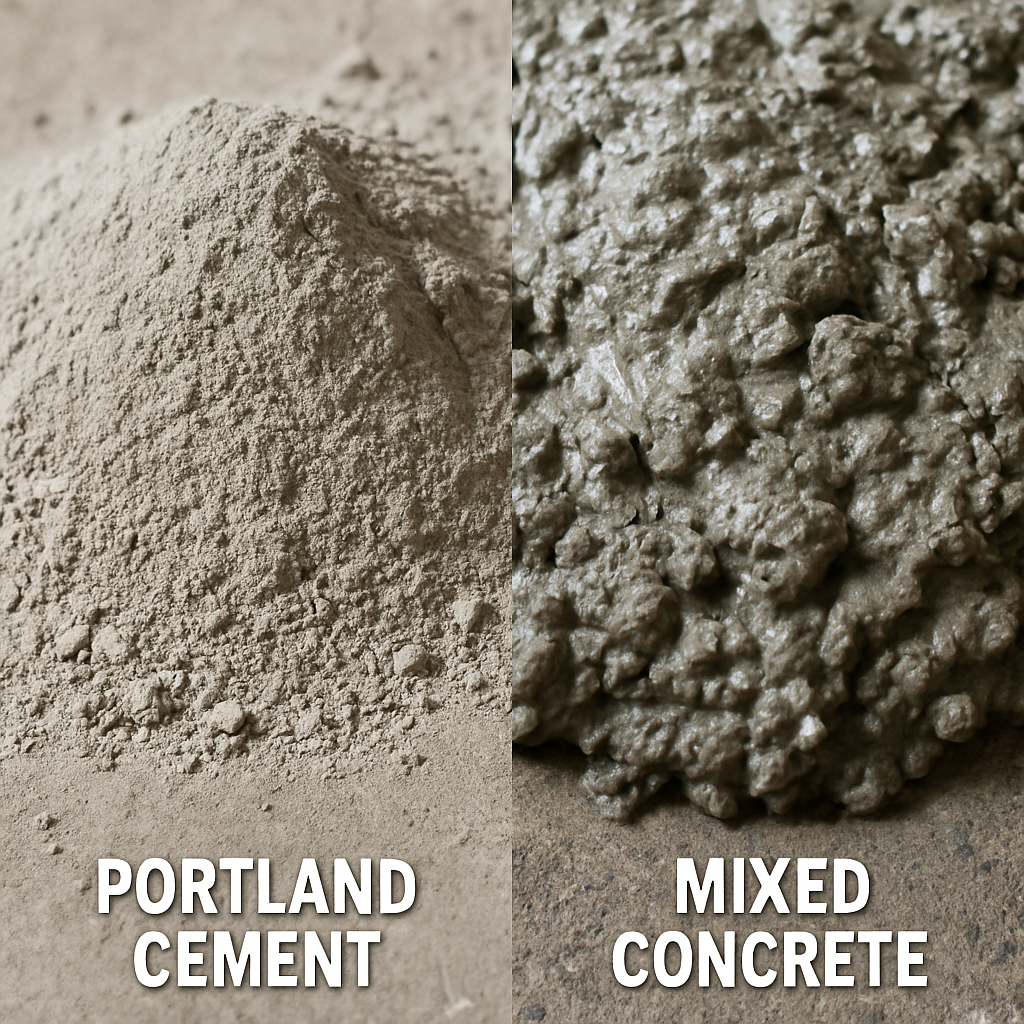
You’ve probably used the words “cement” and “concrete” your whole life as if they were the exact same thing. In practice, understanding the cement vs concrete distinction is the secret to a project that lasts fifty years instead of five. Think of it like baking: cement is simply the flour, while concrete is the finished cake. Cement is just the binder, while concrete is the tough composite of sand, gravel, and water.
Imagine finishing a beautiful garden path, only to watch it crumble into a gravel pit after one winter. According to building experts, these DIY failures rarely happen because someone bought a bad cement bag at the hardware store. The real culprit is a misunderstood water-to-cement ratio. Pouring the perfect concrete mix isn’t about making it wet enough to shovel; it is a delicate equation where too much water creates a weak, soupy mess.
Mastering this chemical recipe and its basic ingredients will save money while delivering professional results.
Is It Cement or Concrete? The Baking Analogy That Saves Your Project
Calling cement “concrete” is like calling flour a “cake.” Cement is the binder—the powdery “glue” designed to hold everything together. While checking out at the hardware store, you might notice a standard cement bag price is different from a ready-to-use concrete mix, but don’t be tempted to use pure cement alone. On its own, it dries incredibly brittle and would quickly snap under the weight of a simple garden bench.
To turn that powdery glue into a durable patio, you must add solid materials called aggregates to build a structural skeleton. Every rock-solid project relies on exactly four key ingredients:
Portland Cement: Specifically, look for portland cement type I/II, the reliable standard for everyday home use.
Water: The chemical activator.
Sand: The fine aggregate that fills microscopic gaps.
Gravel: The chunky rock that gives the slab its crushing strength.
Without those last two ingredients, your project will shrink and crack into a crumbly mess. Locking sand and gravel together with cement creates the true, heavy-duty material you need.
The Perfect Recipe: Why the 1-2-3 Ratio Prevents Structural Failure
Tossing ingredients together without a plan guarantees a crumbly, scaled driveway. The secret to a slab that lasts decades lies in a precise cement to sand to gravel ratio. When perfectly balanced, these materials create a dense skeleton that dictates your concrete’s compressive strength psi ratings—meaning how much heavy pressure it can handle before snapping.
To achieve professional-grade strength, contractors rely on the classic 1-2-3-4 Proportional Rule, measured by simple volume (like shovelfuls or identical buckets):
1 Part Cement: The binding glue.
2 Parts Sand: Fills microscopic gaps for a smoother surface.
3 Parts Gravel: The heavy lifter providing the structural core.
0.5 Parts Water: The chemical activator.
Selecting the correct materials for these proportions matters immensely. Clean masonry sand guarantees a professional finish, while choosing the appropriate gravel size—usually 3/4-inch for standard patios—ensures stones lock tightly within your forms. For extra durability, mixing in fiber reinforcement for structural integrity acts like millions of microscopic bungee cords holding everything together under tension.
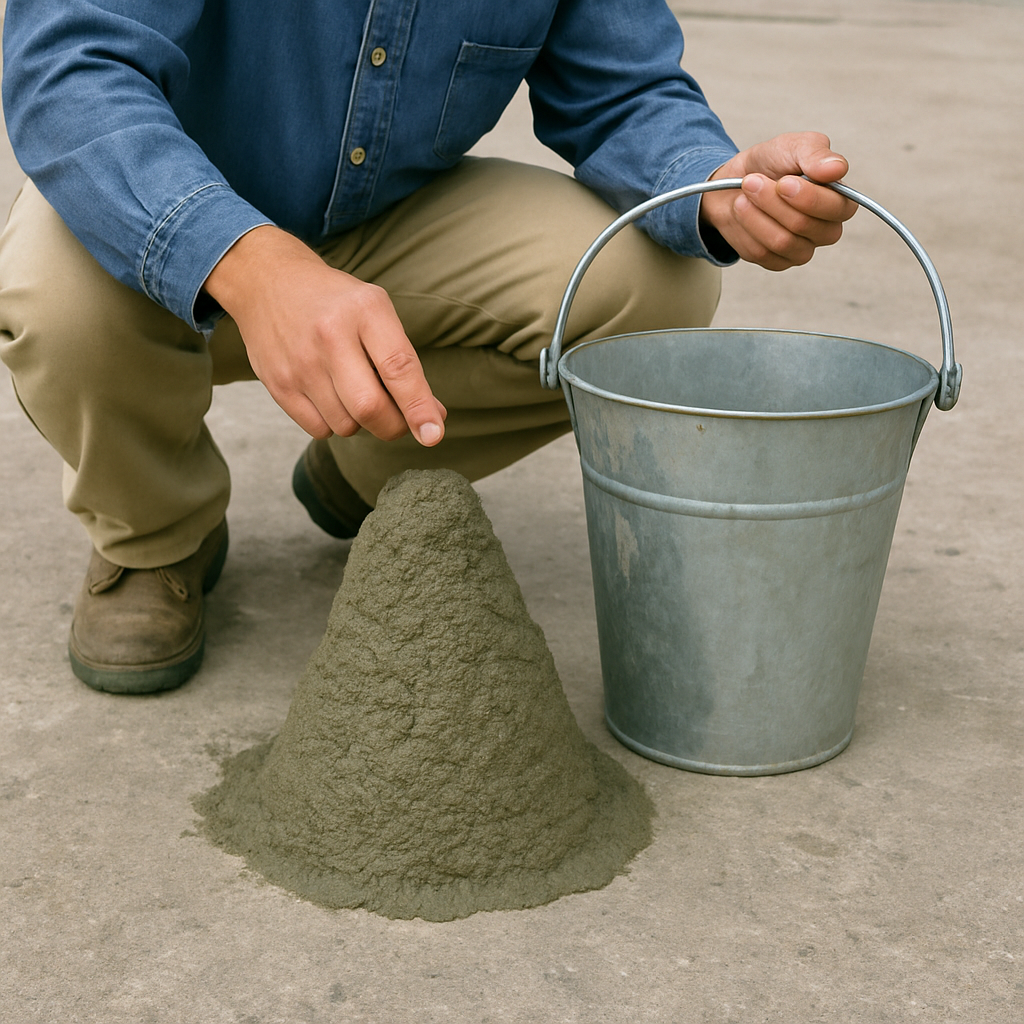
Even with a flawless dry mix, your project’s survival hinges on hydration. Over-hydrating washes the cement right off your rocks, ruining your carefully measured recipe.
The ‘Goldilocks’ Rule of Water: How a Slump Test Ensures Workability
Adding extra water makes heavy concrete easier to stir, but that convenience comes at a steep price. The secret to longevity is understanding the water-to-cement ratio impact, which operates on a strict inverse relationship: the wetter the mix, the weaker the final product. Drowning your cement dilutes the chemical reaction holding the gravel together, leaving you with a fragile, chalky surface.
To find the perfect balance, rely on a visual check called a slump test for workability. You can replicate this at home by packing a plastic cup with wet mix, flipping it upside down onto a board, and lifting the cup away. If the mound instantly collapses into a flat puddle, it is too wet. If it crumbles into dry chunks, you need a tiny splash more water.
Your target is a stable mound that holds its shape while looking glossy, exactly like creamy peanut butter. Hitting this precise consistency is your absolute best defense for preventing cracks in fresh slabs as they cure.
Quikrete vs Sakrete: Choosing the Right Bag for Your Budget
Walking down the hardware store aisle can be overwhelming when facing a massive wall of heavy paper sacks. While DIYers love to debate quikrete vs sakrete performance, both brands offer excellent, pre-blended recipes of cement, sand, and gravel. Your cement bag price will be nearly identical between them at the register. Controlling your overall concrete mix cost isn’t about picking the right brand name; it is about paying only for the specific chemical additives your project actually demands.
Instead of stressing over logos, focus on these main product tiers:
Standard Mix: The budget-friendly choice for non-structural jobs like simple garden pathways.
High-Strength (4000+ PSI): A higher cement ratio makes this mandatory for heavy-load surfaces like driveways.
Fast-Setting: Chemical accelerators harden the mix in just 30 minutes—ideal for fence posts so you don’t have to brace them overnight.
Paying a premium for fast-setting bags is a lifesaver for a mailbox base, but a stressful nightmare for a large patio where you need time to smooth the wet surface. Match the bag type to your project load to ensure longevity without overspending.
How Many Bags Do I Need? Solving the ‘Cubic Yard’ Math Problem
Guessing material amounts often ends in a sore back or a half-finished patio. By multiplying your project’s length, width, and depth, you calculate the total volume. The golden rule is knowing how many 80lb bags for a cubic yard? You need exactly 45 bags.
Hand-mixing two tons of powder is exhausting, which is why smart DIYers draw a line. If your project requires over one yard, a delivery truck saves your weekend. Traditional barrel trucks arrive with wet mix, while volumetric trucks combine dry ingredients right in your driveway to control the exact yield. People often ask how much is cement in these bulk orders, but you are really purchasing the convenience of a complete, blended recipe.
Checking local concrete prices per yard helps decide if paying a delivery fee beats grueling manual labor.
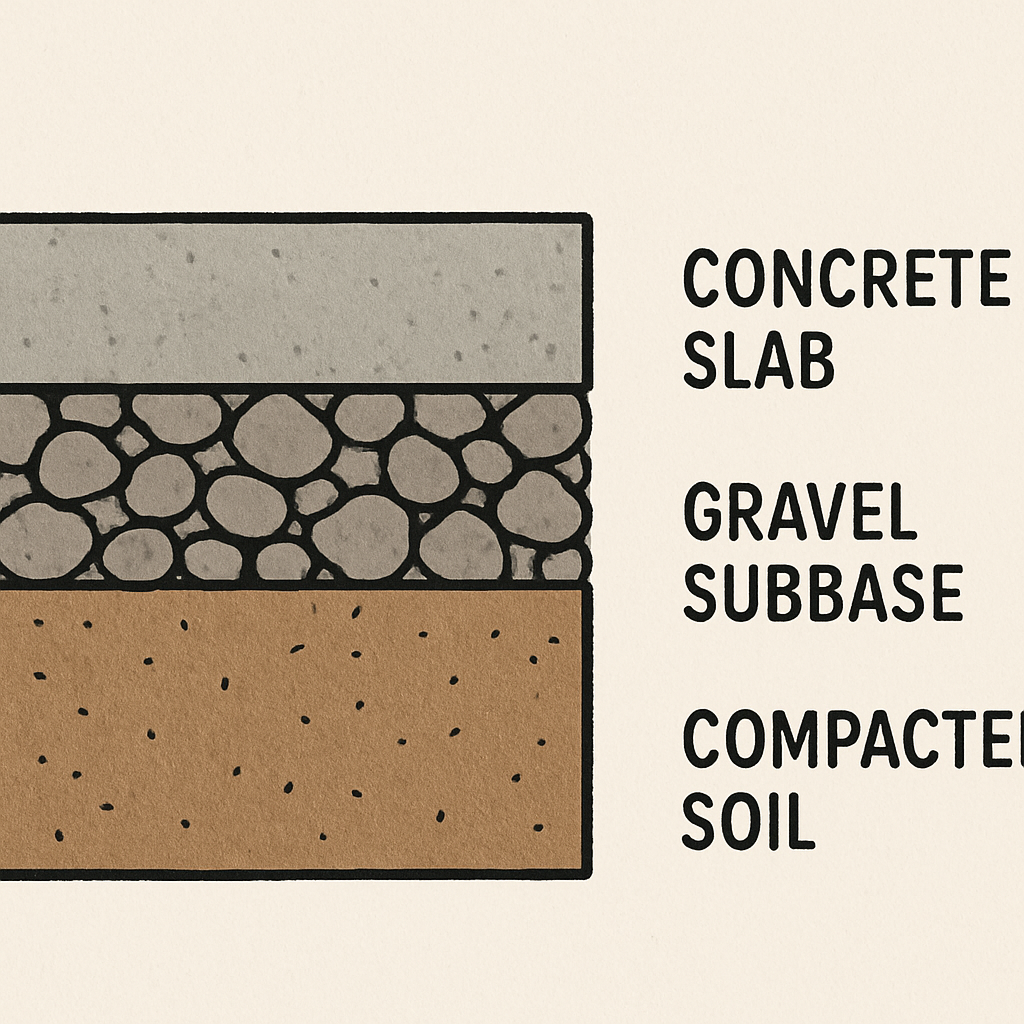
Preparation and Pouring: Why the Subbase is 50% of the Job
Never dump wet mix directly onto soft dirt if you want your project to last. You must build a solid foundation first. This hidden layer underneath is called the subbase, and it usually consists of crushed gravel packed tightly over the raw soil.
Skipping proper subbase preparation for heavy loads guarantees your new slab will eventually crack. Think of it like building a house on a mattress; if the ground underneath shifts, the rigid layer above snaps. Renting a hand tamper to smash that gravel flat creates the stable, draining platform your patio desperately needs to survive the seasons.
Once that gravel is rock-solid, combining your ingredients becomes a race against the clock. Figuring out exactly how long to mix in a wheelbarrow takes practice, but your goal is a smooth, peanut-butter consistency. Move quickly on hot days to avoid a “flash set,” which is when the chemical reaction forces the mixture to rapidly harden before you even finish pouring it.
Dropping temperatures demand entirely different survival strategies. Implementing cold weather pouring precautions, like covering the wet pour with insulated blankets, stops the water inside from freezing and shattering your hard work.
Curing vs. Drying: Why You Shouldn’t Walk on Your New Slab Yet
Most people assume fresh concrete hardens because water evaporates, much like mud drying in the sun. In reality, letting it dry out ruins the project. Hardening is actually a one-way chemical reaction called the hydration process, where water molecules lock together with cement to grow microscopic, rock-solid crystals.
Trapping moisture inside the slab is your biggest priority because these crystals need water to continue growing. Implementing a wet cure—either by lightly misting the surface daily or sealing it under a plastic tarp—keeps this reaction alive. Sustaining a damp environment for just seven days yields up to 50% more strength, effectively minimizing stress fractures.
Patience pays off when scheduling your first footsteps and tire tracks. You can safely walk on the surface after 48 hours, but wait a full week before driving on it to achieve the curing time for maximum durability.
Your Concrete Success Checklist: From Hardware Store to Finished Slab
You started by looking up the cement price, but now you know the real secret is the chemistry of your concrete mix. You’ve transitioned from viewing it as simple powder to understanding how combining the right “flour” creates a rock-solid “cake.”
Guarantee your project lasts decades with this 5-Step ‘Pour Day’ Checklist:
Site prep: Build sturdy forms and dampen the base.
Mix consistency check: Aim for a thick peanut butter texture.
Pouring/Leveling: Fill forms and strike off the excess.
Finishing: Smooth the surface once the water sheen vanishes.
Curing: Cover it up—hydration is crystal growth, not drying!
Keep basic DIY driveway repair techniques handy to easily seal future hairline cracks as your slab ages. The next time you walk on a patio, you won’t just see a grey slab—you’ll understand the chemistry and preparation required to confidently recreate it in your own backyard.
Newsletter Updates
Enter your email address below and subscribe to our newsletter