Before You Go — Get BrandBoa Updates Top Products, Shed Plans & Estimating Tips
Join homeowners, DIY builders & contractors
Subscribe to receive construction product recommendations, shed plan updates, BOQ tips, and useful buying guides for tools, materials, finishes, and building essentials. We’ll help you discover selected products from trusted USA suppliers and share practical ideas to plan, price, and build smarter.
Nothing kills the excitement of a backyard DIY project faster than laying your last concrete block—technically called a Concrete Masonry Unit (CMU)—only to realize you are ten blocks short. Guessing your materials inevitably guarantees a frustrating third trip to the hardware store mid-project.
Answering the common question of “how many cinder blocks do i need” sounds simple until you must factor in the 3/8-inch mortar joints acting as glue between every piece. Relying on a concrete block estimator calculator replaces this dangerous guesswork with true estimation precision, automatically accounting for those tricky gaps and standard waste factors.
Industry data reveals that proper masonry estimation eliminates the risk of overbuying materials by up to 15 percent. Getting this math right ensures you save time with a single delivery, while also securing the exact amount of grout and rebar required for perfect structural integrity.
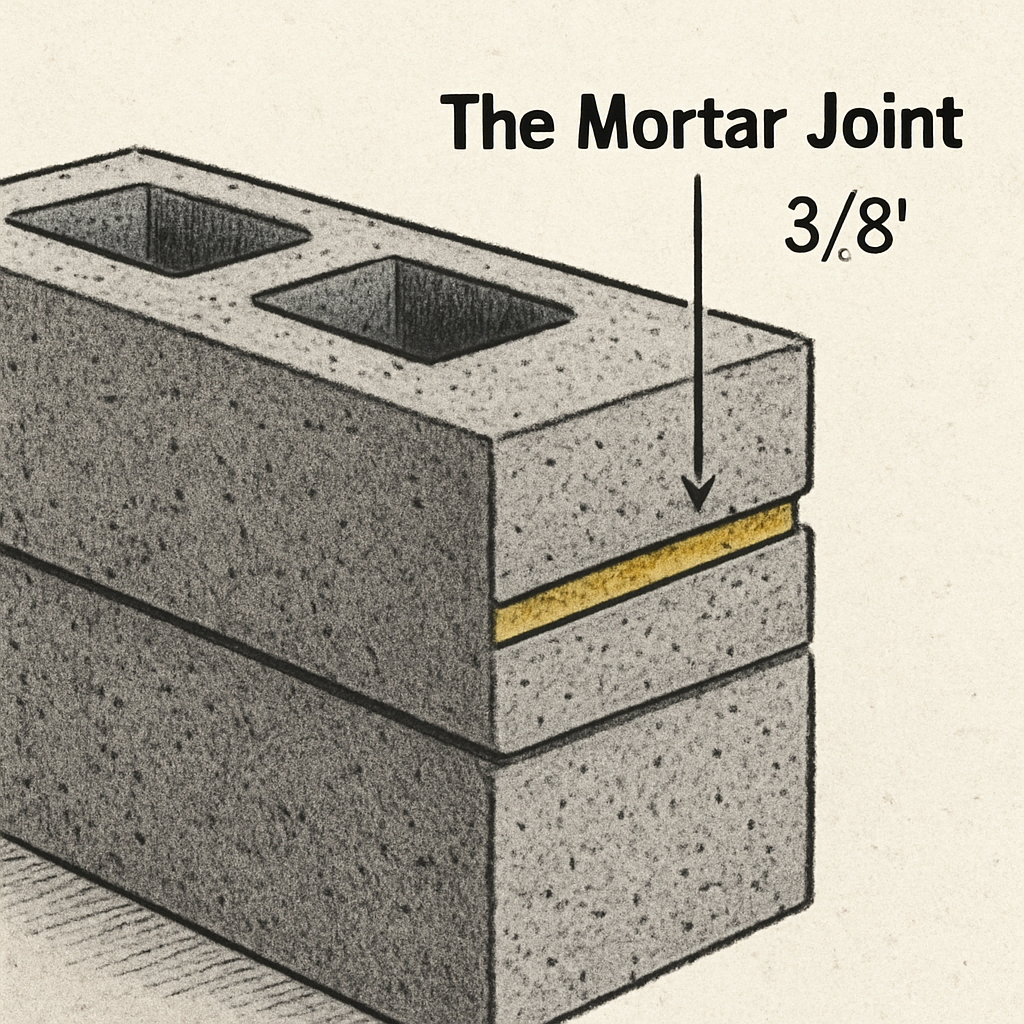
Standard 8x8x16 CMU Dimensions: Why the ‘Missing’ 3/8 Inch Matters
If you measure a block from the hardware store, you might think you were shortchanged. While standard 8x8x16 CMU dimensions are used in 90% of home projects, a tape measure reveals the block is actually only 15 5/8 inches long.
Builders use two distinct measurements to keep project math easy. The “nominal dimensions” describe the total space a block occupies once installed, while the “actual” size is the physical block you hold in your hands. That missing 3/8 of an inch is specifically reserved for the mortar joint—the layer of cement glue holding everything together.
When stacked, this mortar joint fills the empty space perfectly so your wall hits its target length. Here is how common sizes actually measure up:
4-inch block: Nominal 4″x8″x16″ = Actual 3 5/8″ x 7 5/8″ x 15 5/8″
8-inch block: Nominal 8″x8″x16″ = Actual 7 5/8″ x 7 5/8″ x 15 5/8″
12-inch block: Nominal 12″x8″x16″ = Actual 11 5/8″ x 7 5/8″ x 15 5/8″
Forgetting this detail creates a 5% measurement error, leaving you with a wall that stretches further than planned.
How Many Cinder Blocks for a 10×10 Wall? Master the ‘Magic Multiplier’
Instead of relying on complicated calculations, you can find your answer using simple math. Start by measuring wall surface area—just multiply your planned length by your project’s height.
After calculating that square footage, professionals use a “magic multiplier” to skip tedious division. Multiplying your total area by 1.125 gives you an instant, highly accurate estimate. If you are wondering exactly how many cinder blocks for a 10×10 wall you need, follow this step-by-step formula for a 10×10 wall:
Find area (100 sq ft)
Apply multiplier (1.125)
Total blocks (112.5)
Hardware stores unfortunately do not sell half-blocks for your convenience. Always round your final number up to ensure you have enough materials to finish your top course, meaning our square example requires exactly 113 blocks to complete perfectly.
Landing on this baseline count builds confidence, but real-world projects are rarely unbroken, solid squares. When leaving space for a garden gate or turning a 90-degree corner, you must tweak these numbers slightly.
Adjusting for Openings and Intersections: The ‘Shared Block’ and Subtraction Rule
Rarely do we build giant, solid boxes without doorways or gaps for airflow. When measuring wall surface area for masonry, you must subtract the square footage of any planned gaps before applying your multiplier. Think of calculating block for windows or gates just like the main wall: find the area of the hole, multiply by 1.125, and subtract that amount from your grand total.
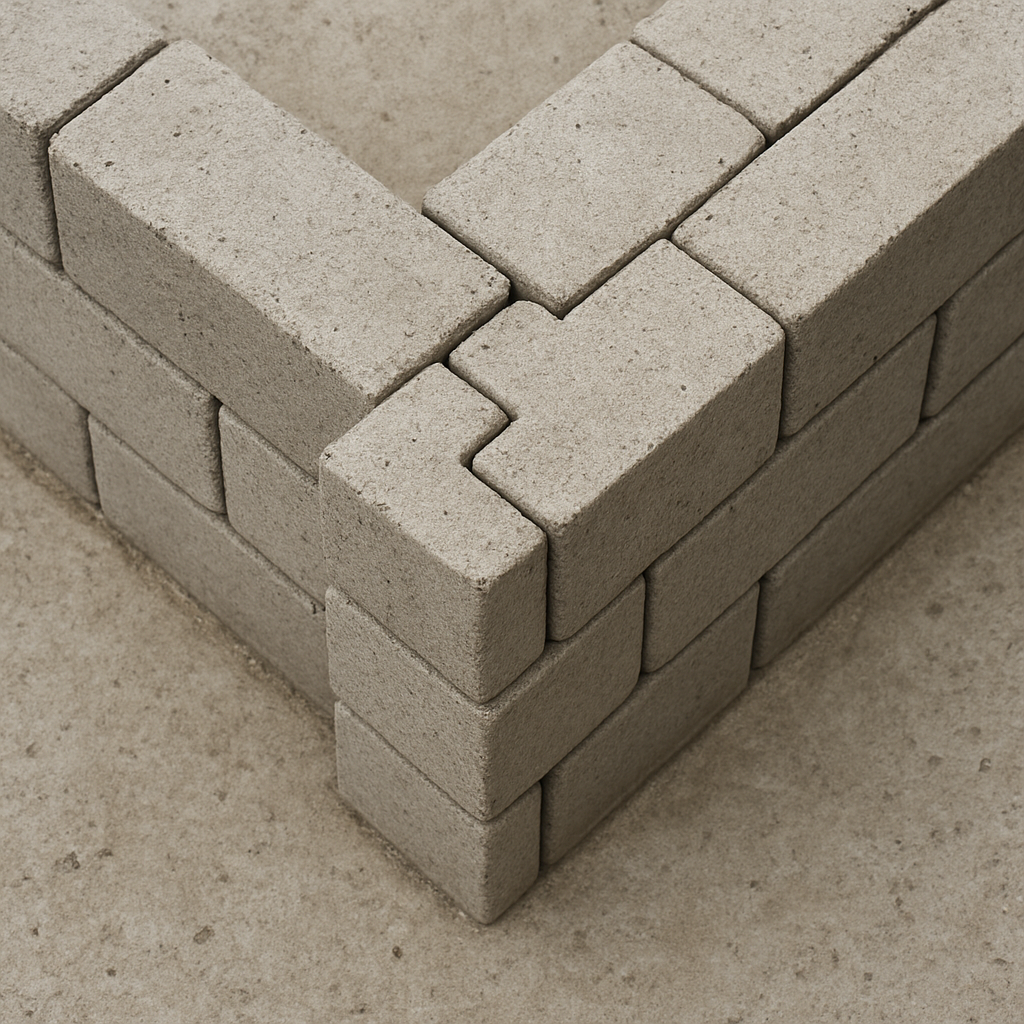
Turning a 90-degree corner introduces a completely different kind of adjustment to your math. When two walls meet, they share the physical space at the intersection, interlocking much like a heavy-duty zipper or a staggered set of Legos.
If you simply add the total lengths of both walls together, you will end up counting that shared space twice. Accurately determining number of corner blocks requires subtracting the thickness of one block (usually 8 inches) for every corner turned, ensuring you don’t over-purchase material for overlapping spaces.
Having exact numbers for these layout changes gives you a mathematically perfect baseline, but real-world construction requires a margin for error.
Calculating the 10% Waste Factor: Planning for Life’s ‘Oops’ Moments
Running out of materials because a few units cracked will instantly halt your weekend project. While your surface area math might be perfectly calculated, one of the most common mistakes in masonry estimation is skipping the buffer percentage. You must add a 10% waste factor for concrete blocks to your final tally to survive life’s inevitable “oops” moments.
Material loss typically happens in three predictable ways once the heavy lifting begins:
Shipping damage: Pallets bounce during transit, easily chipping brittle corners before they even reach your yard.
Half-block cuts: Splitting units to fit exact wall edges rarely goes perfectly on the first strike.
Chipping during installation: Dropping a unit or tapping it too hard into place causes structural cracks.
Ordering extras slightly increases your initial cinder block cost, but it guarantees you avoid paying steep secondary delivery fees just to finish the last row. Plus, any leftovers make excellent garden edging or sturdy planter bases.
Beyond the Blocks: Estimating Mortar Bags and Sand Ratios
Stacking blocks without “glue” won’t create a sturdy wall. Once your cement block estimator gives you the total unit count, you must calculate the mortar filling those 3/8-inch joints. Buying too little stops your weekend project in its tracks, while buying too much eats into your budget.
Industry averages easily take the guesswork out of calculating mortar bags for masonry. If you plan to buy pre-mixed bags from the local hardware store, use this simple rule of thumb:
General yields: One 80lb bag of pre-mix mortar usually sets 10-12 standard 8x8x16 blocks.
Creating your own batch from scratch is much cheaper for larger yard projects. To do this properly, you must follow the standard masonry sand and cement ratio for mortar. The magic formula is always three parts sand to one part cement (3:1), which provides the perfect balance of strength and flexibility.
Accurate planning lets you coordinate bulk sand drops with your block delivery, saving you multiple expensive shipping fees.
Strengthening the Build: Rebar and Structural Grout Volume Requirements
Concrete blocks look tough, but their hollow centers require an internal skeleton to handle heavy loads and prevent long, ugly cracks.
Building this skeleton means dropping steel rods down the empty spaces and pouring fluid cement to lock them in. Calculating rebar and grout volume requirements is easy. You typically need one vertical rebar rod for every 4 feet of wall length. Next, you pour structural grout for hollow core blocks inside those cavities. A standard rule is that 100 blocks need roughly 1 cubic yard of grout.
Side-to-side strength is equally crucial. You achieve this by sandwiching wire mesh between block layers. Managing your horizontal joint reinforcement spacing simply means placing this wire every second row. Use this checklist for structural needs:
Vertical rebar spacing (one rod every 4 feet)
Horizontal wire reinforcement (mesh every 2 layers)
Grout volume per 100 blocks (1 cubic yard)
Factoring in these internal pieces guarantees your wall survives for decades.
From Counts to Costs: Preventing Hidden Expenses in Masonry Projects
Now that you have your final material count, calculating your base concrete block cost is as simple as multiplying that number by the local unit price. For smaller backyard projects, stacking individual units is highly cost-effective when comparing cinder blocks vs poured concrete walls, which require expensive wooden forms and massive cement trucks.
However, the sticker price rarely matches your final receipt if you ignore logistics. Building a realistic budget means accounting for hidden expenses before you ever start digging the necessary footing requirements for heavy block walls:
Delivery fees
Pallet deposits (which can add $20+ per pallet, usually refundable)
Equipment rental (mixers)
Understanding these extra fees prevents frustrating surprises at the checkout counter.
Your Masonry Roadmap: Three Steps to a Perfect Order
You no longer have to guess how many blocks you need or worry about mid-project hardware store runs. Mastering the basics of masonry project planning transforms confusing math into a straightforward strategy, saving you both time and money.
Before scheduling your delivery, protect your budget by following this final checklist:
Double-check your length and height measurements.
Run the concrete block estimator calculator.
Add a 10% waste factor for those inevitable “oops” moments.
Order your mortar and rebar alongside your blocks.
Start laying your first course of blocks with total confidence. You now know exactly what to order, avoiding the frustration of running out of materials mid-build.
Newsletter Updates
Enter your email address below and subscribe to our newsletter