Before You Go — Get BrandBoa Updates Top Products, Shed Plans & Estimating Tips
Join homeowners, DIY builders & contractors
Subscribe to receive construction product recommendations, shed plan updates, BOQ tips, and useful buying guides for tools, materials, finishes, and building essentials. We’ll help you discover selected products from trusted USA suppliers and share practical ideas to plan, price, and build smarter.
Have you ever spent twenty minutes at the hardware store picking through a pile of lumber just to find one piece that isn’t twisted like a pretzel? According to contractor estimates, home DIYers waste up to 15% of their project time simply wrestling with warped or bowed wood. Traditional timber has a mind of its own, constantly shifting with humidity and age.
Fortunately, there is a reliable alternative you have probably walked past a dozen times. While you might associate lightweight metal framing systems with skyscrapers and hospitals, aluminum studs are quietly moving into residential basements and garages. Unlike lumber, a metal 2×4 offers absolute consistency that stays true forever. Because the material ignores moisture, you never have to worry about hidden rot or termites ruining your hard work.
Trading heavy timber for aluminum building studs also completely changes how you physically handle a weekend renovation. Imagine being able to carry the raw materials for an entire partition wall in one hand without breaking a sweat.
Tracks and Studs 101: Understanding the ‘Lego System’ of Metal Framing
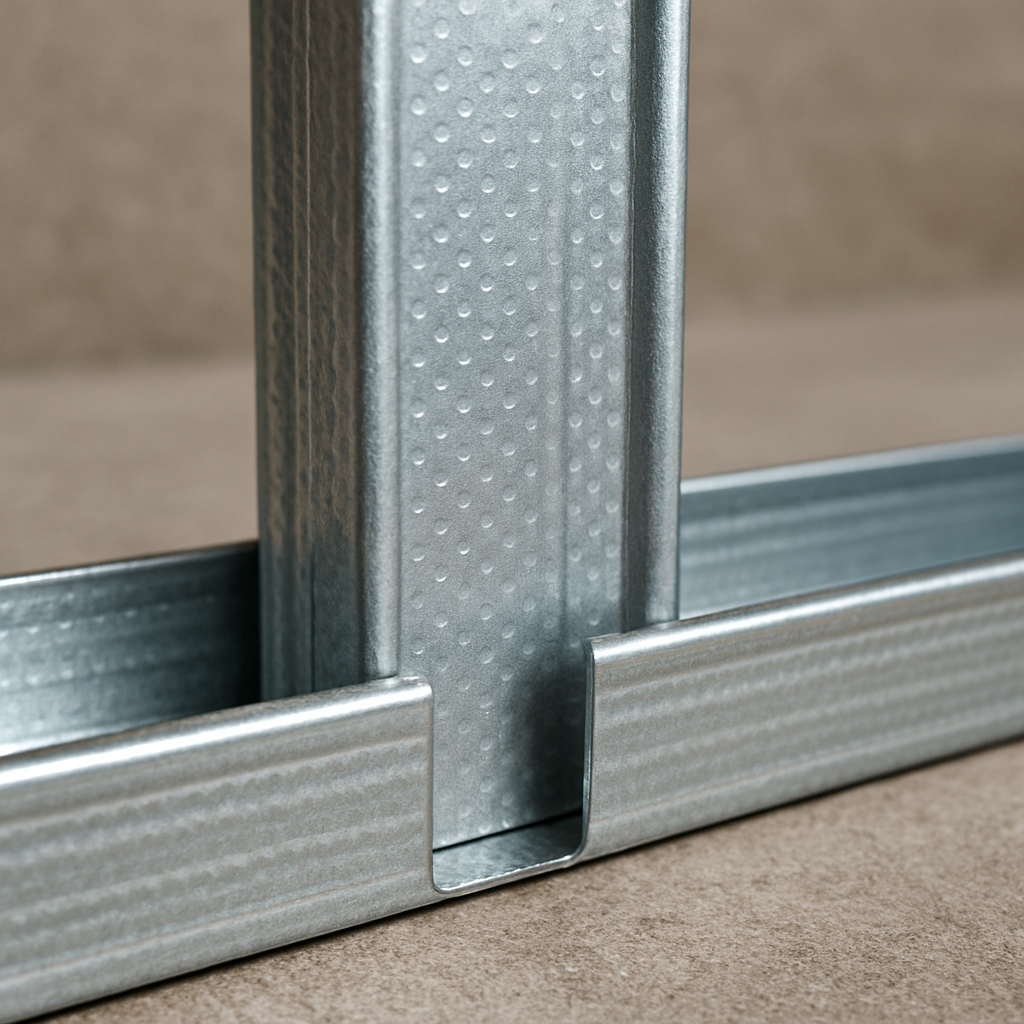
If you are familiar with building a basic wood wall, you already know about the top and bottom plates that hold the structure together. A metal track and stud system uses that exact same skeleton, but swaps heavy timber for a clever, lightweight setup. Think of it like a giant set of adult Legos that perfectly snap into place.
Mastering these metal two by fours comes down to understanding three essential pieces:
Track: The U-shaped channels that replace your wooden top and bottom plates, anchoring directly to your floor and ceiling.
Stud: The vertical supports that slide effortlessly into the track.
Grommets: Small plastic rings that snap into the pre-punched holes along the studs, protecting your electrical wires from sharp edges.
The real magic happens during assembly. Because the vertical aluminum wall studs are designed to be slightly narrower than the tracks, they nest neatly inside the channel. This completely eliminates the frustrating need to “toe-nail” screws at awkward angles. You simply slide the vertical piece in, twist it into position, and secure it with a single screw on each side. Once your skeletal frame is locked in, you will quickly see why this system is highly effective for defeating rot, termites, and fire.
The Basement Hero: Defeating Rot, Termites, and Fire with Non-Combustible Materials
Anyone who has dealt with a damp basement knows wood acts like a giant sponge. When standard lumber gets wet, it swells, warps, and eventually rots. By swapping traditional timber for moisture resistant framing options like metal, you eliminate the worry of hidden water damage ruining your newly finished space.
Beyond surviving minor leaks, these corrosion resistant wall studs offer absolute defense against hungry pests. Termites chew through wood because it is organic (made of living matter), treating your wall skeleton like an all-you-can-eat buffet. Aluminum and steel are inorganic, offering zero food source for insects and stopping expensive infestations before they even start.
Peace of mind also extends to safety, especially when running electrical wires. Because metal naturally qualifies as non-combustible building materials (materials that will not ignite or burn), it adds a powerful layer of protection to your home. Using them creates safer fire rated wall assemblies, which actively slow down flames instead of feeding them like dry wood does.
Getting all this heavy-duty protection against rot, bugs, and fire might sound like you are signing up to haul massive steel beams. Fortunately, building an indestructible wall is surprisingly gentle on your muscles.
Save Your Back: The Surprising Portability of Lightweight Metal Framing
Hauling lumber down basement stairs usually requires a helper. By contrast, lightweight metal framing systems eliminate this heavy physical demand. You can easily carry ten aluminum studs at once, whereas just two wooden boards would have you sweating.
The secret to this zero-strain portability is the “gauge” system, which measures thickness. Counterintuitively, a higher gauge number means thinner metal because it represents how many sheets stack up to equal one inch. A standard 25-gauge metal 2×4 offers rigid strength for interior walls while weighing practically nothing.
Sparing your back from heavy lifting leaves you with plenty of energy for the actual construction. Framing a room by yourself becomes an easy weekend reality when your materials work with you. Fortunately, cutting and assembling these frames requires no heavy machinery.
From Tin Snips to Screw Guns: The Only Tools You Need to Frame Like a Pro
Leaving the dusty miter saw behind means zero sawdust tracking through your house. Learning how to cut metal studs is surprisingly quiet, requiring only a pair of aviation snips. Think of these as heavy-duty scissors designed specifically for slicing thin sheet metal. Just snip down both sides of the stud, bend the metal back, and cleanly snap it off in seconds.
Your entire assembly setup fits easily inside a small bucket. To build walls precisely, you only need this simple tool kit:
Aviation snips
Cordless impact driver
Level
Self-tapping screws
The magic of this assembly process happens right at your familiar cordless drill. Instead of pounding nails, installing metal track and stud framing uses self-tapping screws. These specialized, flat “wafer-head” fasteners feature a tiny drill bit at the tip, meaning they carve their own perfect pilot hole as they spin in. Later on, fixing drywall to metal tracks works exactly the same way using standard fine-thread drywall screws that easily pierce the thin aluminum.
The ‘Will My TV Fall?’ Myth: Mastering Strength and Soundproofing in Metal Walls
Staring at a lightweight skeleton, you might wonder if a heavy television will pull it down. When evaluating the structural integrity of metal framing, remember the difference between simple dividers and structural walls. People often ask, are metal studs load bearing? The standard versions sold for residential DIY projects are strictly for partition walls, securely dividing space without supporting the roof overhead.
Securing heavy objects simply requires a little foresight before hanging drywall. Because thin metal cannot reliably hold up kitchen cabinets alone, you must use a technique called “blocking.” Blocking involves installing a piece of scrap wood horizontally between two metal uprights exactly where your television will mount. This hidden reinforcement gives your mounting bolts solid timber to grab, safely combining metal’s perfect consistency with wood’s heavy holding power.
Beyond hidden strength, these assemblies naturally quiet down noisy households. Soundproofing metal stud walls is highly effective because thin metal acts like a shock absorber. Dense wood rigidly transfers vibrations directly between rooms, but metal gently flexes to break up sound waves—a professional trick known as “acoustic decoupling.”
Counting the Cost: Why Metal vs. Wood Framing Is More Affordable Than You Think
Budgeting for a basement remodel often brings sticker shock because lumber prices bounce around like a yo-yo. Fortunately, the metal vs wood studs cost debate is shifting thanks to metal’s reliable price stability. Whether pricing lightweight aluminum building studs or steel alternatives, material costs remain predictable from planning to purchase, saving you from sudden budget spikes mid-project.
Finding your true bottom line means looking beyond just the initial price tag. To accurately compare materials and avoid hidden expenses, consider these three factors:
Base price per foot: Metal pricing directly competes with the cost of premium, straight-cut wood.
Waste reduction (zero cull): The “cull rate”—the percentage of warped, unusable scrap you end up throwing away—is zero with consistent galvanized framing components.
No specialized tool rental: You can skip renting bulky miter saws because metal easily cuts with cheap tin snips and fastens with a standard household drill.
Keeping money in your pocket instead of the scrap bin leaves more budget for fun, visible finishes.
Your Weekend Blueprint: A 3-Step Plan to Start Your First Metal Stud Project
With a basic understanding of this lightweight system, tackling a basement framing project becomes highly manageable.
Start by measuring your room, then head out to purchase your tracks and standard 25-gauge aluminum wall studs. Begin your build by installing metal track and stud components directly onto your floor and ceiling, creating the horizontal guides before simply snapping your vertical pieces into place.
This modern approach delivers the ultimate peace of mind metric: flawless walls, complete rot resistance, and zero termites. The intimidation factor is gone, because the truth is simple: if you can safely hold a basic screwdriver and a pair of tin snips, you already possess all the skills required to build an en
Newsletter Updates
Enter your email address below and subscribe to our newsletter